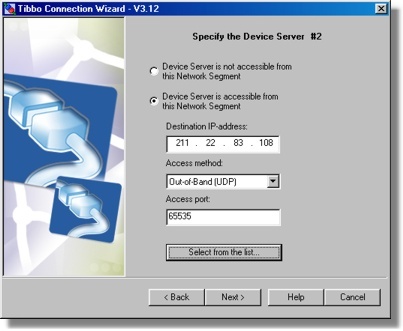
DS #2 (Can be Local or Remote)
On this step you select the second DS in the DS-to-DS link (it is called the "DS #2").

The DS #2 can be located anywhere, i.e. be local or remote.
In most cases you complete this step as follows:
| • | Select Device Server is accessible from this network segment. |
| • | Click Select DS button and choose the DS from the list. The button brings up the dialog, similar to the main window of the DS Manager. In fact, it is the DS Manager, with the following two differences: |
| • | There is an additional Select button. To select a particular DS single-click on the DS in the device list (in the auto-discoveryor address book access mode) and press Select. Alternatively, you can double-click on the DS in the device list. |
| • | The COM access mode is not available when the DS Manager is called from within Wizard. This is because you are choosing a network destination for the VSP so the DS has to be selected from the list of devices, accessible through the network! |
| • | Click Next. |
This step provides a choice of several access options for the DS #2- read additional info on accessing the DS for more information.
When you click Next the Wizard attempts to contact the target DS and verifies if this DS is local or remote. The DS of your choice must be available on the network, or the Wizard won't allow you to continue. Moreover, the IP-address of this DS must be reachable*. If everything is OK the Wizard reads out all current setting values of this DS.
What if the DS #2 is not visible from the PC
If the PC and the DS #2 are located on different network segments it may well be that the DS #2 is not "visible" from this network segment (and hence, from the DS #1) but the DS#1 is visible from the DS #2. This is normal as many networks are not symmetrical. For example, if the DS #1 has a public (real) IP-address and the DS #2 is located on a firewalled network segment then the DS #2 can connect to the DS #1, but the DS#1 (and this PC) cannot connect to the DS #2.
To specify that the DS is not visible from this PC select the Device Server is not accessible from this network segment option and click Next .
There are two implications of this choice:
| • | In this DS-to-DS connection it is the DS #2 that will always be connecting to the DS #1, since DS #1 cannot connect to the DS #2. |
| • | The Wizard won't be able to setup the DS through the network (this is because it cannot "see" the DS). You will have a chance to setup this inaccessible DS through its serial port or through a temporary network connection. You will be given a choice to do this within current Wizard job or generate a configuration script and finish the setup later, using the finish remote job feature of the Connection Wizard. |
* The DS Manager and the Connection Wizard have the ability to "see" local Device Servers even if the IP-address of these devices is unreachable (this is done by using broadcast communications- read about this here). The reason why the Wizard demands that the DS #2 has a proper IP-address is because the DS #1 will probably have to establish a real data connection with this DS and that requires a reachable IP-address.