In this step you will configure a Device Server to connect to the LinkServer. Perform the following:
| • | Connect a Device Server to the network and power it. |
| • | Run DS Manager (Start > Programs > Tibbo > DS Manager). |
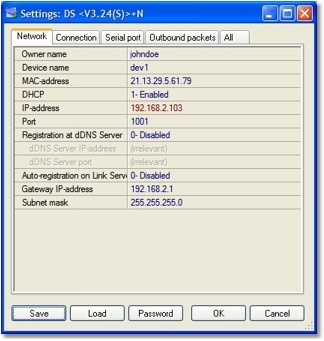
| • | Select the Device Server and click Settings. This is the first tab you will see: |

| • | Set Owner name to the same name as your account in the previous step (Adding a DS as User). In our example, this is johndoe. |
| • | Set Device name to the same name as your Device Server in the previous step. In our example, this is dev1. |
| • | Don't forget to make sure your Device Server has a valid IP -- by enabling DHCP, or setting a valid IP address manually. |
| • | Set Gateway IP-address to the correct gateway for your subnet, so the Device Server could get reach the LinkServer (assuming the LinkServer is not on the local subnet). |
| • | Click the Password button and set a password for the DS. This has to be the same password you configured for it in the previous step. In our example, this is Vlf6Lr!. |
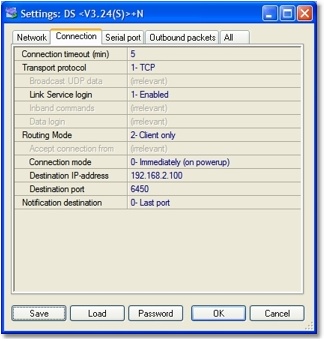
| • | Now, click the Connection tab: |

| • | Set Transport Protocol to TCP. |
| • | Set Link Service login to Enabled. |
| • | Set Routing Mode to Client only. |
| • | Set Connection mode to Immediately (on powerup). |
| • | Set Destination Port to 6450. |
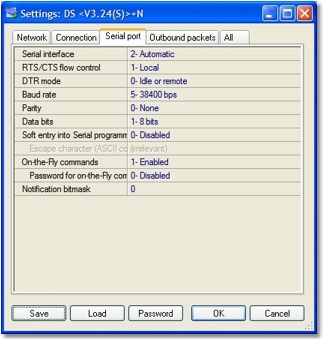
| • | Now, click the Serial Port tab: |

| • | Set the serial settings according to your device (RTS/CTS flow control, DTR mode, Baud rate, Parity, Data bits) |
| • | Set On-the-Fly commands to Disabled. |
| • | Click OK to apply the settings and close the dialog. |
| • | DS Manager will reset the Device Server. |
| • | Assuming you did everything correctly up to here (including all previous steps), the DS should now blink the green LED a few times and then light it steadily. This means that a connection has been established. If you get another LED pattern, find out what it is under Status LED Signals and try to troubleshoot it from there. |
| • | If you now log-on to your account in the LinkServer, you will see the Device Server as Online under Device Servers. |


