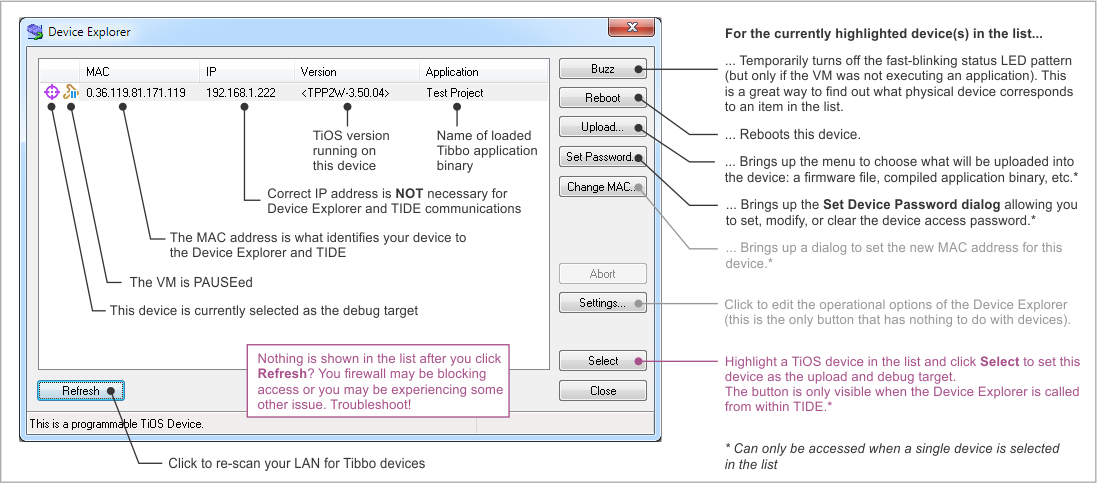
Device Explorer (Select/Manage Target)
 From TIDE: Debug > Select/Manage Target, or
 File > Project Settings —> Select (button)
Directly from Windows: Windows Start > Tibbo > Tibbo IDE > Device Explorer
See also: Compiling, Uploading, Running

Device Explorer is not a dialog, but a utility that installs alongside TIDE. It can be launched directly from Windows or called from within TIDE.
Once Device Explorer opens, it shows the list of discovered Tibbo devices. Click Refresh to re-scan the network.
Only devices connected to the local network segment will be detected. In other words, there must be no routers or bridges between your PC and your Tibbo device. Hubs and switches are OK.
If the list remains empty even after you click Refresh, see When You Can't See Your Target.
Selecting the Target
Device Explorer can be used to upgrade your device's firmware and perform several other management tasks, but its single most important feature is the Select button. This button is only visible when Device Explorer is called from within TIDE.
Highlighting a device in the list and clicking Select sets this device as the upload and debug target for the currently opened project.
 Device Explorer shows the currently selected target with a crosshairs icon.
Device List
 T-icon. This icon to the left of each entry shows whether this device is executing an application or if the VM is stopped.
- MAC. It is the MAC, not the device's IP address, that is used to identify your programmable device to Device Explorer and TIDE.
- IP. The IP address is NOT essential to the Device Explorer and TIDE communications. It is shown for reference only.
- Version. This is the TiOS version running on the device.
- Application. This field shows the name of the currently loaded application binary.
Buttons That Work on the Currently Highlighted List Entry
Highlight a device by single-clicking it in the list, then click one of the buttons listed below.
Note that the Buzz, Reboot, and Upload... buttons will also work if you highlight multiple devices (this is achieved by clicking items while holding down [SHIFT] or [CTRL]).
- Buzz. This feature is useful when you have many devices and need to find out what physical device corresponds to an item in the list. Click the button and the corresponding device's red and green status LEDs will temporarily stop playing a fast-blinking pattern. This won't work if the VM of this device is executing an application (because if it does, then the status LEDs are under the control of the pat. object).
- Reboot. Click to reboot the corresponding device. You can select and reboot multiple devices at once.
- Upload... Click to expose a list of firmware and application upload choices. Multiple devices can be selected and uploaded to.
- Load Firmware Through the Network. Select to upload new TiOS firmware or TiOS firmware combined with an application binary.
- Load Application Through the Network. Upload an application binary. TiOS will remain intact.
- Load Firmware Through the Serial Port (X-modem). This is how you save a bricked device. Read XModem Serial Upgrades to learn more.
- All remaining choices are not useful to you.
- Set Password... Allows you to set or modify a password that will be required to upload new firmware and/or application into the corresponding device. Setting an empty password disables the password protection.
Device Explorer memorizes (caches) passwords set for devices. The cache is maintained as a list saved on your PC. To clear the cache click Settings... to open the Settings dialog. There, click on the Clear password cache link.
There is a way to clear an existing password or set a new one. After your device powers up, press and hold the MD button, then click Set Password... and set an empty password or enter a new password. The password protection remains disabled as long as you keep the button pressed.
When the password is being set or changed, it is transmitted across the network "in the open." Therefore, you should set passwords in a secure environment where you can make sure no one is eavesdropping. Subsequent device "log ins" (in order to debug, upload an application or firmware, etc.) are safe (i.e., passwords are not transmitted in the open and eavesdropping on the network won't allow a listening party to intercept them. - Change MAC... Click to edit the device's MAC address. Be careful with this!
All MACs must be unique and an official MAC address is assigned to each device at the factory. Do not alter the MAC address unless you have a specific reason to do so.
Also, the first number of the MAC must be 0! Entering a MAC that doesn't start with the zero (1.2.3.4.5.6) will not work — the device will boot with the first number in the MAC address cleared to zero (0.2.3.4.5.6). - Select. Already explained above.
Device Explorer Settings
The Settings button opens up the Settings dialog. You really don't need to concern yourself with this dialog unless you are experiencing problems or need to clear the password cache.
