Network Updates
The Monitor/Loader (M/L) on the EM500, EM510, EM2000, EM2001, TPP2(G2), TPP2(G3), and TPP3(G2)) supports firmware updates via Ethernet.
The M/L on the WM2000 and WS1102 supports firmware updates over Wi-Fi, but only after the autoconnect parameter of the Device Configuration Block (DCB) has been set to yes.
Prerequisites
To perform a firmware update over the network, you will need:
- The firmware file to be uploaded to your device
- You may upload just a Tibbo OS (TiOS) firmware file (.BIN); all TiOS firmware is available here: https://tibbo.com/support/downloads/tios.html.
- You may upload TiOS combined with a compiled application binary; to create combined files, use our BinMerger web app or the legacy BinMerger utility.
- The target device must be connected to the same network segment as your PC
- The EM2001, TPP2(G2), and TPP3(G2) have an integrated RJ45 Ethernet jack.
- The EM500, EM510, and EM2000 require an Ethernet front-end (magnetics and RJ45) to be connected externally. If your module is "on its own" (not integrated into a host device), then the easiest way to connect it to your Ethernet network is by plugging it into an evaluation (EV) board. We offer EV boards for all three devices.
- For a WM2000 or WS1102, you will need to enable its association with a Wi-Fi access point that is a part of your local network. To achieve this, you will need to configure three DCB parameters: autoconnect, ssid, and password. This can be done via the BLE console or the Companion App that ships preloaded on WM2000 modules.
- Tibbo's Device Explorer utility, which is available as a standalone application or as part of Tibbo IDE (TIDE).
- You will need to be able to push the MD button on your Tibbo device (or pull its MD line LOW).
- Optional: you will benefit from observing the patterns "played" by the status LEDs of your Tibbo device.
Update Procedure
After connecting your Tibbo device to your local network — either through Ethernet or Wi-Fi — carry out the following steps to update its firmware:
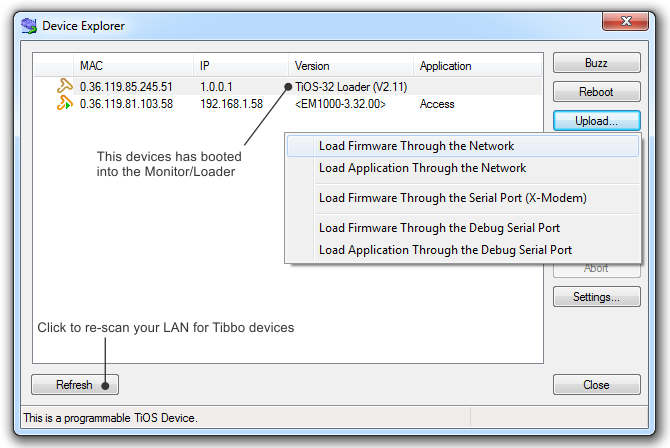
- The M/L flowchart shows how to place your device in the update mode's Network Phase. Alternatively, follow this step-by-step infographic:
1. On your computer, run the Device Explorer utility.
2. The target device should appear in the list and its version should read: "TiOS-32 Loader (Vx.xx)" — "Vx.xx" is the firmware version of the M/L.
3. If your device does not appear on the list, click Refresh to rescan the network for Tibbo devices.
4. Select the target device in the list, click Upload, and choose Load Firmware Through the Network.
5. A dialog will open prompting to select a file. After doing so, click Open to begin the upload (the green status LED will flicker while the yellow status LED will remain solid).
6. Your device will reboot automatically after the update is completed.

Additional Details
- If your device supports BLE (Bluetooth Low Energy) Updates, the M/L will advance to that phase if a network connection has not been established within 15 seconds.
- On the WM2000 and WS1102, you can press the MD button to skip the network connection and advance to the BLE Phase.
- On the WM2000 and WS1102, if the autoconnect DCB parameter is set to no, the M/L will wait for 15 seconds without making any actual attempts to associate with an access point.
- If your device doesn't support BLE updates, the M/L will wait indefinitely to establish a network connection.
For more information on the various update modes and how the M/L selects and handles them, see these two flowcharts:
- The flowchart for all programmable Tibbo devices except the WM2000 and WS1102
- The flowchart for the WM2000 and WS1102

