TPB Structure

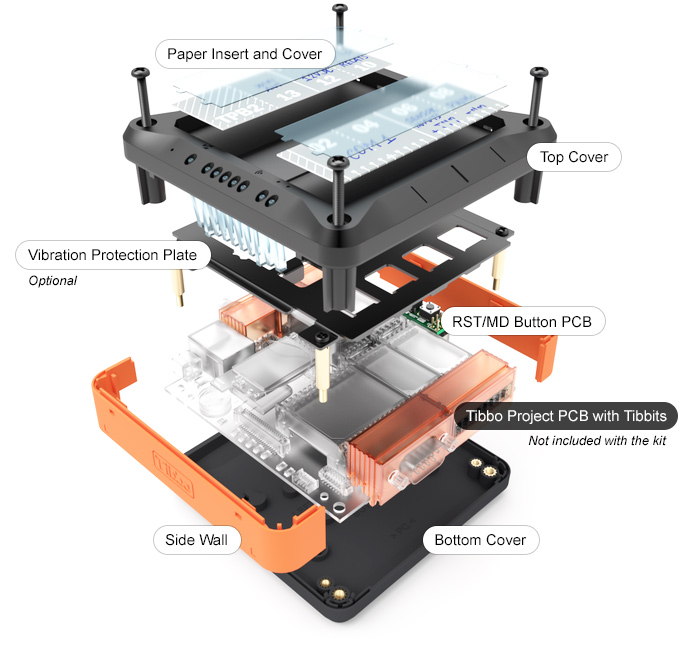
This exploded view illustrates the internal construction of a Tibbo Project System (TPS) assembled in a Tibbo Project Box (TPB). Specifically, this is a size 2 system (TPS2) in the Size 2 Tibbo Project Box (TPB2).
A TPB is comprised of a bottom cover, left and right side walls, a top cover, and an LED light guide. Aside from the TB2L, which has an LCD and keypad, the top cover has two recesses for paper inserts and protective cover overlays. The paper inserts are for marking wires and connectors in the same way you mark direct dial buttons on your office phone.
Assembling a TPB is extremely easy and fast. Snap the LED light guide into the top cover, then attach the left and right walls onto the top cover. All three parts snap into place with a "click." To avoid confusion, the inner surface of the bottom cover has arrows indicating left, right, top, and bottom. The left wall has the "L" mark on it, while the right wall is marked "R." Notice that the left wall has a cutout for the terminal blocks and the RJ45 jack of the Tibbo Project PCB (TPP).
There are two sets of screws supplied with each TPB. Smaller screws secure the TPP, while large screws are for the TPB itself. Pay attention to the TPP placement. In the normal bottom cover orientation (judging by arrows printed on the inner surface of the cover), the RJ45 jack should face away from you. Notice that the bottom cover has a small protrusion on which the RJ45 rests if the TPP is correctly installed.
Each TPB kit additionally includes the MD/RST button PCB. This PCB plugs into the TPP and is necessary if the TPP is assembled into a TPB.
The vibration protection plate shown above is optional and must be purchased (specified) separately as a part of the vibration protection kit (VPK).
