#22, M1S: RTD Temperature Meter

Function: RTD temperature meter
Form factor: M1S
Category: Input module
Special needs: ---
Power requirements: 5V/10mA


Details
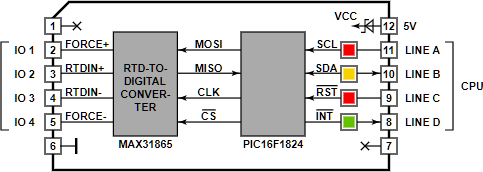
Tibbit #22 is based on the MAX31865 15-bit RTD-to-digital converter IC. This Tibbit can work with platinum RTD sensors (PT-RTDs) in the 100Ω to 1,000Ω range. Our Tibbo BASIC demo application (see below) supports PT100, PT200, PT500, and PT1000 sensors (this is selectable in code, see the main.tbs file).
In addition to the MAX31865 IC, Tibbit #22 also carries a PIC16F1824 microcontroller. The microcontroller interfaces the converter IC to the main CPU of the host Tibbo Project PCB (TPP). With the right firmware, it can also be used for data preprocessing (for example, for the averaging of measurements to increase measurement precision).
Combine Tibbit #22 with #21 (four terminal blocks), #20 (nine terminal blocks) or #19 (DB9M connector). It's possible, but not common, to use the latter for wiring into the meter's inputs.
Tibbit #22 is very accurate. Here are the results of measurement comparisons between Tibbit #22 and a Fluke 726 process calibrator:
- PT100 sensor: Measurements performed by Tibbit #22 deviated from those of the calibrator by no more than 0.5°C in the temperature range from –100°C to +400°C. The error did not exceed 2.5°C outside of this temperature range.
- PT1000 sensor: Measurements performed by Tibbit #22 deviated from those of the calibrator by no more than 0.5°C in the temperature range from –125°C to +550°C. The error did not exceed 2.5°C outside of this temperature range.
Connecting the RTD Sensor
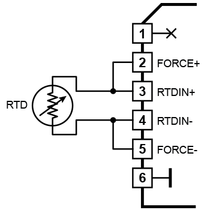
You can use two-wire or four-wire sensor connections. The two-wire connection does not allow the system to compensate for errors caused by cable resistance. Therefore, this type of connection is suitable for cases where the sensor cable is short:

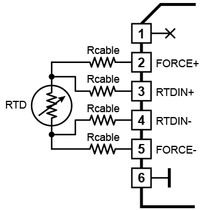
The four-wire connection eliminates errors caused by cable resistance. It is recommended for cases where the sensor is located at some distance from the Tibbit:

LEDs
There are two red, one yellow, and one green LED. The first red LED is connected to the SCL line of the I²C interface, while the second one is connected to the –RST line of the PIC microcontroller. The yellow LED is connected to the SDA line of the I²C interface. The green LED is on the –INT line.
Sample Project
The use of Tibbit #22 is illustrated by a Tibbo BASIC test project. You can find it here: https://github.com/tibbotech/CA-Test-Tibbit-22.
