TEV-KB0
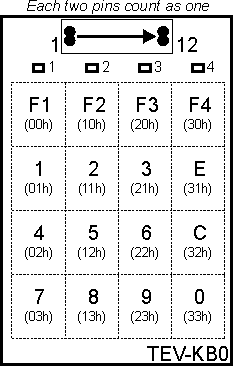
The TEV-KB0 board carries 16 keys and four green LEDs. The keys are arranged as a 4x4 matrix, with four scan lines and four return lines. Each scan line additionally controls one green LED.
TEV-LBx Board Connector
The TEV-KB0 is connected to the TEV-MB0 motherboard through a 2x12-pin connector. Each two pins of the connector are combined together for better electrical contact. Therefore, the connector effectively has 12 lines.
|
Pin # |
Function |
Keypad |
|
1 |
VIN (12V) |
|
|
2 |
5V |
|
|
3 |
3.3V |
|
|
4 |
GND |
|
|
5 |
GPIO24* |
Scan1, LED1 |
|
6 |
GPIO25* |
Scan2, LED2 |
|
7 |
GPIO26* |
Scan3, LED3 |
|
8 |
GPIO27* |
Scan4, LED4 |
|
9 |
GPIO28* |
Return1 |
|
10 |
GPIO29* |
Return2 |
|
11 |
GPIO30* |
Return3 |
|
12 |
GPIO31* |
Return4 |
* I/O pins of the EM1000 module
Required Tibbo BASIC/C Initialization Code
This section assumes that you are familiar with Tibbo BASIC/C and Tibbo IDE (TIDE).
For correct board operation, click Project -> Settings, and select the EM1000 or EM1000G platform. Additionally, click Customize to open the Customize Project dialog. In the dialog, double-click Keypad (kp.) object and choose Enabled.
The following initialization code should also be added to your project:
kp.scanlinesmapping="24,25,26,27"
kp.returnlinesmapping="28,29,30,31"
io.num=PL_IO_NUM_24
io.enabled=YES
io.num=PL_IO_NUM_25
io.enabled=YES
io.num=PL_IO_NUM_26
io.enabled=YES
io.num=PL_IO_NUM_27
io.enabled=YES
kp.enabled=YES
All key-related events are served in the event handler for the on_kp() event. The key_code argument carries the code of the key. Keycodes of each key are indicated in parentheses on the drawing above. For example, key <5> has the code of 12Hex.
Each scan line of the keypad also controls one LED. To turn on the LED, set the corresponding scan line LOW. This will not affect the operation of the keypad.