Displaying Images
The lcd.bmp method outputs a full image, or a portion of the image, from a BMP file. Naturally, this file must be present in your project (see how to add a file). Here is a simple example of how to display an image:
romfile.open("mad_happiness.bmp")
lcd.bmp(romfile.offset,0,0,0,0,65535,65535) 'see how we set maxwidth and maxheight to 65535 (max value). This way we specify that the entire image should be displayed (if only it can fit on the screen)
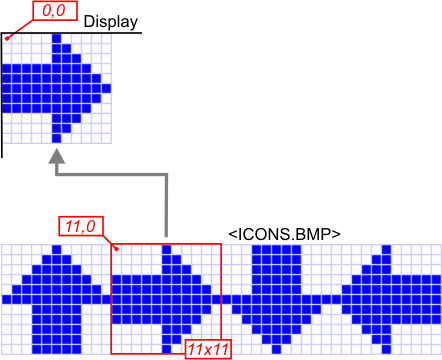
One powerful feature of the lcd.bmp method is that you can selectively display a portion of the image stored in a BMP file. This opens up two interesting possibilities. First, you can scroll around a large file image by specifying which part you want to see. Second, you can combine several images into one large file and display required portions when needed. For example, if your project requires several icons, you can put them all into a single "strip." This improves performance, because you don't have to open a separate file to display each icon:
romfile.open("icon_strip.bmp")
lcd.bmp(romfile.offset,0,0,11,0,11,11) 'display the second icon (right arrow)
Note that only 2, 16, and 256-color modes are currently supported and that lcd.bmp will return 1 — NG if you try to display any other type of BMP file. Compressed BMP files will be rejected too.
The method takes into account the type of the currently selected controller/panel. The method will check the values of lcd.paneltype, lcd.bitsperpixel, lcd.redbits, lcd.greenbits, and lcd.bluebits (explained in Understanding Controller Properties) and produce the best output possible for the selected display.