Firmware Updates
Updating the firmware on the LTPP3(G2) is not a particularly difficult process, but you'll need a few things:
- A computer with Internet access and serial terminal software
- A USB cable with at least one Type-C connector
- A USB flash drive or microSD card
- Jumper(s)
Step-By-Step Instructions
1. On your computer, prepare the image for the Linux environment you want to install. Tibbo offers ready-to-use files for its Yocto-based and Ubuntu-derived distributions.
2. Copy the image file — which must be named ISPBOOOT.BIN — to your USB flash drive or microSD card. Whichever removable media type you use, it must be formatted as FAT32 with a block size of 2,048 bytes.
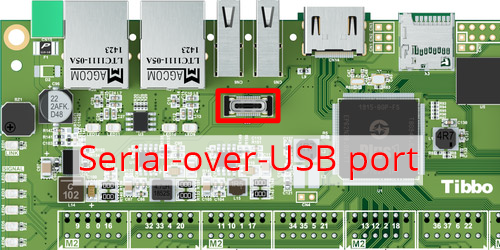
3. If the board is installed in a Size 3 Linux Tibbo Project Box (LTPB3), you will need to remove the top cover of the enclosure — and the vibration protection plate, if present — to access the serial-over-USB port and the jumper blocks. While following the progress of the update via the serial console is technically optional, we strongly recommend that you do so not only to watch for errors, but also to know when the process has been completed.
4. With the LTPP3(G2) turned off, insert your removable media.
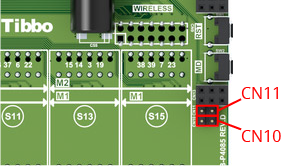
5a. If you're using a USB flash drive, place a jumper on jumper block CN11 (perpendicular to the nearest edge).
5b. If you're using a microSD card, you'll need to jump both CN10 and CN11.

6. Connect your computer to the serial-over-USB port on the board. This would also be a good time to start your preferred serial console software. Make sure it's set to 115,200bps, 8 bits, no parity, and 1 end bit.

7. When you power on the LTPP3(G2), it will boot up, scan for removable media, and begin the update. In the serial console, you'll see various sequential write operations and the saving of the Linux environment to MMC. When the process is done, "ISP all: Done" will be printed on the console.
8. Power off the board and remove the jumper(s), the update media, and the USB Type-C cable.
LED Patterns (Ubuntu V0.5.0 and Later)
V0.5.0 of Tibbo's Ubuntu-based distribution introduced LED patterns for the update process. These patterns provide visual feedback regarding what the device is doing before, during, and after an update:
 The green status LED is solid on for three seconds when initiating the update
 The blue LED bar will cycle back and forth repeatedly while an update is in progress
 The green status LED blinks slowly when a firmware update is complete
 The red status LED is solid on if an error is encountered
