Union Mounting (Overlays)
Version 0.5.1 of Tibbo's Ubuntu-based distribution for the LTPP3(G2) introduced support for union mounts.
Union mounting enables you to overlay read/write partitions over a read-only root file system holding your base installation. Overlays provide temporary storage for your applications, which reside in the main partition and cannot be modified — thus ensuring that they are always in a functioning state.
For example, you have temporary application data stored in an overlay. Resetting or power-cycling the device clears the overlay, leaving your application in its initial configuration and ready to start over. This capability makes it quick and easy to return to a working state, regardless of whether you are developing or deploying.
Configuring Partitions
Overlay partitions must be configured before you create your image. To help you with this task, we've created an interactive script that's included in our Docker container.
 If you haven't used Tibbo's Docker container to customize an image, see our tutorial video for instructions on how to get started: https://youtu.be/e0b5b6HtLbg.
Before executing make to create your image, run the tb_overlayfs.sh script to configure the sizes of your partitions.
./tb_overlayfs.sh
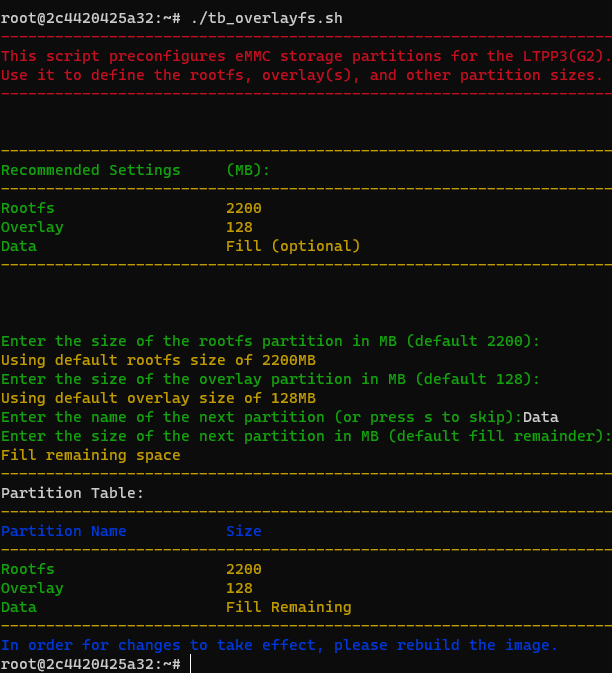
You will be prompted to input your desired sizes for the rootfs and overlay partitions. If you'd rather use the default recommended value, just hit enter.
If you have eMMC storage left to allocate after creating the rootfs and overlay partitions, you can create additional partitions. The script will prompt you to name each partition and then define its size. Alternatively, you can input s to skip creating additional partitions.
Notes:
- Valid characters for partition names are letters, numbers, and underscore ("_").
- If you set a partition size that is too small, the build process will terminate with an error. If the total size of all your partitions exceeds the eMMC storage capacity, the installation process will terminate with an error.
 Note that the script does not enable union mounting. This is because doing so would prevent you from updating the system and installed packages. See the next section for instructions on enabling the overlay once you have finalized your root file system.
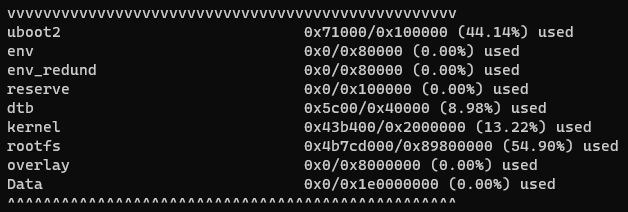
Later, when you run make to create your image, the final output will list the partitions that will be created in your device's eMMC storage.
Enabling the Overlay
After you've created an overlay partition, you need to configure your system to use union mounting and write-protect your root file system. This is achieved through two variables whose values you define in the U-Boot environment after the installation of your image.
|
Variable Name |
Description |
|
tb_overlay |
Tells the installer the location of the overlay (e.g., /dev/mmcblk0p9). This enables the overlay and union mounts it to root ("/"). Note that the overlay itself is mounted to /overlay — be careful not to use this directory. |
|
tb_rootfs_ro |
When set to true, the overlay partition is cleared every time the system is rebooted or power-cycled. |
Step-By-Step Instructions
Before you enable overlays, you need to ensure that your installation is configured to use union mounts. Please note that upgrades to systemd will likely alter the configuration.
For this process, you'll need to access the serial console.
1. Boot the LTPP3(G2) and log in.
2. Make sure the init script points to tb_init.sh:
sudo ln -sfn /sbin/tb_init.sh /sbin/init
ls sbin/init -l -a
3. Reboot and interrupt the start-up process by pressing any key. This will leave you at the U-Boot prompt.
4. Enter the following commands:
=> printenv b_c
b_c=console=tty1 console=ttyS0,115200 earlyprintk
=> setenv b_c $b_c tb_overlay=/dev/mmcblk0p9 tb_rootfs_ro=true
=> setenv emmc_root root=/dev/mmcblk0p8 r rootwait
=> saveenv
This should result in the following message:
Saving Environment to MMC... Writing to redundant MMC(0)... OK
5. Reboot or power-cycle the device.