Ethernet Port Lines
 This is a legacy product. The following is provided as it was documented originally, albeit with some corrections and changes for clarity and style.
Pin Assignment
|
Pin Number |
Signal Name |
Direction |
Description |
|
#6 |
TX+ |
Output |
Positive line of the differential output signal pair |
|
#7 |
TX- |
Output |
Negative line of the differential output signal pair |
|
#3 |
RX+ |
Input |
Positive line of the differential input signal pair |
|
#4 |
RX- |
Input |
Negative line of the differential input signal pair |
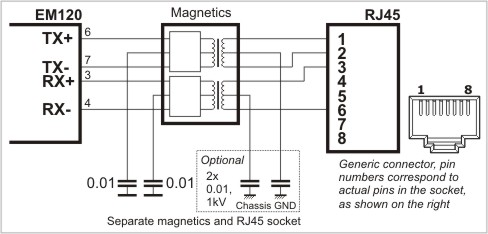
Ethernet port of the EM120 is of 10BaseT type. Onboard electronics of the EM120 do not include Ethernet magnetics, so magnetic circuitry must be connected externally. You can use either a standalone magnetics part (such as YCL-20F001N, schematic diagram shown below) or RJ45 connector with integrated magnetics.

It is important to make the PCB wire connections between the Ethernet port pins of the EM120 and external magnetics circuitry as short as possible. Making the wires too long may cause the noise level generated by your PCB surpass the maximum radiated emission limits stipulated by FCC and CE regulations. Additionally, longer Ethernet lines on the PCB will make your board more susceptible to the damage from the ESD (electrostatic discharge).
